Iris
Iris is an Immediate mode GUI Library for Roblox, based on Dear ImGui, designed for building the UI for debug / visualisation and content-creation tools.
Iris does this by requiring the developer to only describe what they want and not how they want it to be done, and Iris will handle all of the 'how'. This allows quick iterations from simple and minimal code to produce the tools you need anywhere in your game. Iris makes it faster and more convenient for developers to use a wide range of powerful widgets to build their UI systems. Iris is aimed at the developers who need to quickly check and alter code in development rather than an end UI solution, but how you use it is up to you.
Iris uses an immediate mode UI paradigm, which is different from other conventional UI libraries designed for Roblox. Instead of keeping a reference to every UI element, with Iris you declare the UI you want to appear every frame and it will show you what you asked for. Iris also manages the layout and arrangment of systems whilst also giving control to you making it simple to construct a fully suite of UI debugging tools without worrying about where the UI is going to be positioned.
Demonstration
Simple Example
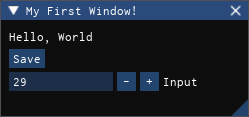
With just 8 lines of code, you can create a basic window and widgets, with instant functionality:
local StarterPlayerScripts = game.StarterPlayer.StarterPlayerScripts
local Iris = require(StarterPlayerScripts.Client.Iris).Init()

Iris:Connect(function()
    Iris.Window({"My First Window!"})
        Iris.Text({"Hello, World"})
        Iris.Button({"Save"})
        Iris.InputNum({"Input"})
    Iris.End()
end)

We can break this code down to explain Iris better:
local StarterPlayerScripts = game.StarterPlayer.StarterPlayerScripts
-- We first need to initialise Iris once before it is used anywhere. `Init()` will
-- begin the main loop and set up the root widgets. Init can only be called once per
-- client and returns Iris when called.
local Iris = require(StarterPlayerScripts.Client.Iris).Init()

-- 'Connect()' will run the provided function every frame. Iris code will need to run
-- every frame to appear but you can use any other event and place your code anywhere
Iris:Connect(function()
    -- We create a window and give it a title of 'My First Window!'. All widgets will
    -- be descended from a window which can be moved and scaled around the screen.
    Iris.Window({"My First Window!"})
        -- A text widget can show any text we want, including support for RichText.
        Iris.Text({"Hello, World"})
        -- A button has a clicked event which we can use to detech when the user
        -- activates it and handle that any way we want.
        Iris.Button({"Save"})
        -- Iris has input, slider and drag widgets for each of the core datatype
        -- with support for min, max and increments.
        Iris.InputNum({"Input"})
    -- Any widget which has children must end with an 'End()'. This includes
    -- windows, trees, tables and a few others. To make it easier to see, we can use
    -- a do-end loop wrapped around every parent widget.
    Iris.End()
end)
More Complex Example
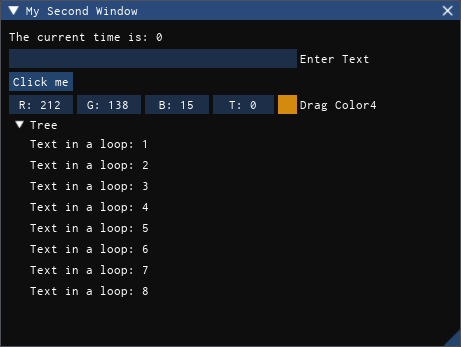
We can also then make a more complicated example:
local StarterPlayerScripts = game.StarterPlayer.StarterPlayerScripts
local Iris = require(StarterPlayerScripts.Client.Iris).Init()

Iris:Connect(function()
    local windowSize = Iris.State(Vector2.new(300, 400))

    Iris.Window({"My Second Window"}, {size = windowSize})
        Iris.Text({"The current time is: " .. time()})

        Iris.InputText({"Enter Text"})

        if Iris.Button({"Click me"}).clicked() then
            print("button was clicked")
        end

        Iris.InputColor4()

        Iris.Tree()
            for i = 1,8 do
                Iris.Text({"Text in a loop: " .. i})
            end
        Iris.End()
    Iris.End()
end)

This example has introduced the state object which allows us to control the state or value of Iris widgets and use these values in actual code. This is the bridge between your variables and being able to modify them in Iris. We also demonstrate the tree node which is useful for helping organise your UI tools.
Adding to your Game
So far we've seen how Iris works in a simple environment, but Iris is most helpful when you are using it alongside your main code. In order to showcase this, we have taken 'The Mystery of Duval Drive' and added Iris which allows us to test and modify the game state when testing the game.
For more examples of Iris being used in actual games as either debug and visualisation tools or for content creation tooling, checkout the Showcases page.